I'm looking for...

Showing posts with label cape. Show all posts

Wednesday, May 2, 2012

How to sew a basic seam with double faced wool

     As promised I'm going to explain to you, how I made my double faced wool cape. I'm going to show you my way of making a basic seam, a dart, bound buttonholes and how to hem with this special fabric. Since the garment is going to be double faced, both sides have to look polished. So every seam has to be concealed and as unnoticeable as possible. 
    
   This is how a double faced wool looks from the side.


    It looks like two fabrics are attached to one another, and the truth is that they are! They hold to each other and therefore feel like one piece, because they are anchored together with thread. You'll see what I mean in a while. First we need to prepare our seams.

So here's what you have to do.
1. Cut out all your pattern pieces, as your patterns says and 
as you would normaly do,
 using the seam allowance it suggests.

2. Now double the seam allowance, in your head, don't touch the pattern!
My pattern called for 1,5 cm, so that makes 3cm.

3. Machine baste, with a contrasting colour thread around all pattern pieces.
My machine does not have grooves for more than 2cm, so I marked the 3cm point with adhesive tape.


    Let me get this straight for you. The final garment will have a 1,5 cm seam allowance. We are only doubling it to use it as a guide. See the grey and red wool are held together and I had to separate them. In order to keep a straight line I needed reference.

After you baste all the edges, it looks like this.
[this was the sample, so the line is not perfect straight]


    Half of it is seam allowance. The other half, that lies between the seam allowance and the basting thread, is only there because the seam allowance will fold inwards. Got it?

4. Now take your thread cutter and carefully, using your fingers, open the edge of the fabric.
    Don't stretch the fabric. We want it to keep it's shape. So use the tread cutter to cut the thread that holds them together. Open all the way to the basting thread. The basting thread is your limit. That's how far you can go. Ok?


After you've done this for all the pattern pieces you are ready to begin sewing!
It takes time, but it's worth it!

5. We are going to machine stitch the red side and hand sew the grey side.
While I was making my sample I noticed that hand sewing didn't look as good on red.
So red would be machine stitched!

Align the pattern pieces, as the pattern calls and pin them together.
Be careful to pin only the red seam allowances.
You may have to pin down the grey ones, to avoid sewing over them too.


6. Sew at 1,5 cm.


7. Press open and flat only the red seam allowances.


8. Trim the red seam allowances half width or less.

9. Press the grey seam allowances inwards, forming the edges that will be sewn.
Check and trim them as you did on the red ones.


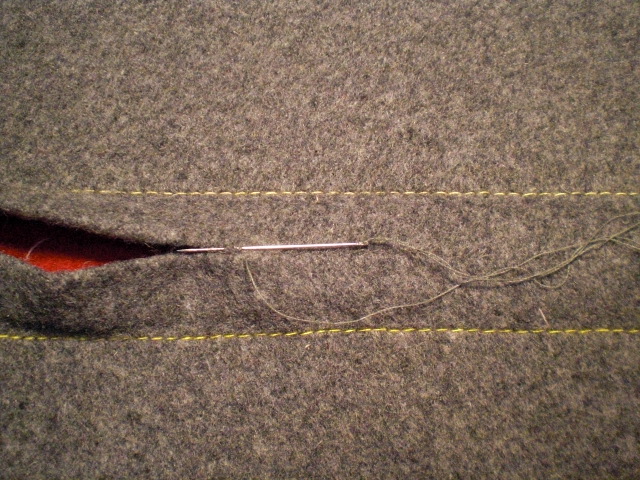
10. Sew them by hand.


Tada! You made a double faced seam!
After all the seams are finished you can unpick the basting thread and 
give the seam a good press, with a pressing cloth.

    As for the kind of stitch I used for hand sewing, I used a drawstitch. This is how Claire Shaeffer calls it. To be honest I found out this is a "known" stitch, after I tested different versions of my own imagination and decided this looked best. As you can see in the pics above, you catch a small area of the fabric, right on the folded edge, moving from right to left (I'm right handed) and then you do the same for the opposite side. I tried to kind of cross my stitches, so that the beginning of the one on the bottom side would be in the middle of the stitch on the upper side. Did that make sense?
    I also waxed the thread, to make it stronger.


See you around
Maria

Sunday, April 29, 2012

Double faced cape - details

So this is the pattern of my double faced cape.

M5913

and this is the technical view

Line Art

I made view C.
You can see why I chose this one. There only a few seams.
I also eliminated the centre back seam, to cut down the work a little bit.


As lovely as that red is, it won't come out right on the pictures. I hope you get the idea though.

I bought the buttons before I started sewing the cape and I hadn't really decided if I would use red on red, but when I finished, I knew I had to sew red on grey and vice versa.


Aren't these red ones cute? They look like glass.


Tip! If you decide to make a double faced garment, make sure to pick buttons of the same size for both sides!
And this is how they are sewn.


As you can see, I made bound button holes.
I had never made them before, either by machine or hand.
They are not hard to make, but they do take time and your full attention.

This is how they look on red


and on grey


Grey hides things easier as you can see.

Back darts.


Can you see them? 
That was the point! To make them invisible!

Collar


Side seams


The red one is sewn by machine and the grey by hand.

Bell loops


The only con is that, if I want to wear the cape from  the other side,
 I have to take the belt off and pass it through all the 4 belts openings and the loop.


And finally the hemming.
All sewn by hand.


I'll post a couple of tutorials on how to get these results.

See you around
Maria


Saturday, April 28, 2012

Double faced cape = 2 capes!

   I came across this gorgeous fabric about a year and a half ago. I bought a couple of meters of it, not having a clue what to do with it! This was the first time I saw double faced wool in two different colours. One side red, one side grey. I loved both colours and I had to make something using both of them. Double faced means that the garment has to look perfect on both sides. This may be easier if you use two fabrics, but how do you do it with one? I searched and searched on books and the web, but I was not able to find any instructions or suggestions. So I came up with my own!
   I had to conceal each and every seam. That means that more than half of the garment is sewn by hand... so the less seams the better! I came across this pattern by McCall's and I though it would be perfect. Only a few seams and a preview in red to get the full idea!

M5913

I usually don't like capes, but the belt in this one makes all the difference. I ordered the pattern and after a few months Burda had some cape patterns too, but I chose to stick to this one. 
Now I'm the pride owner of two capes, a grey and a red one! 


Each side gives a hint of what's hidden to the other side, so I used grey buttons on red and red on grey to exaggerate the look. I like so much that the other side shows when I move my arms. 


I fitted my right out the envelope. I didn't bother making a muslin, because a cape it's meant to be loose, so I didn't expect any fitting issues.


This project took me a lot of time to complete. Firstly I had to interrupt it, to start working on my graduation dress, which I'll post soon. Then I needed something easier that didn't involve hand sewing and mean while life was taking over my sewing, so after a few months, here it is! Thankfully spring weather was kind enough to allow a couple of cold days and give me the chance to wear it! It feels lovely. The wool is so warm. I only felt cold to my arms, elbow down, but I won't consider this a con. 


This project could also be called, how to make a really simple pattern the most difficult project ever!
Details really mattered here. So slow and precise hand sewing was in order. 
Tomorrow I'll show you all the details and I think I'll post a couple of tutorials too, on how to work with such a double faced fabric.

See you around
Maria


Related Posts Plugin for WordPress, Blogger...