I'm looking for...

Showing posts with label tutorial. Show all posts

Saturday, January 19, 2013

Shelf pin board

   Let's say you need a pin board but your space is limited and you don't want to make holes on the wall... do what I did!
 

    Buy a cheap photo frame and replace the glass with cork! I used the sample picture that comes with the frame to cut 2 pieces of the cork, because it was quite thin. Place it in the frame and done! Probably the fastest project I've made!

     Ok I'll be honest with you. I didn't need it as much. I've never used one before, I find other places to put my notes on, but I'm about to start some serious studying and a little space renovating felt good. Plus I really wanted to use those cute push pins! Look at them! Now I have to take a note to pin!
Wish me luck, because I'm going to spend days and days on this desk.


See you around 
Maria

Thursday, July 19, 2012

How to hem double faced wool

   This is the last of my tutorials about my double faced cape. Please read the previous ones to have a spherical view on the method I followed and this one will be a piece of cake, I promise!


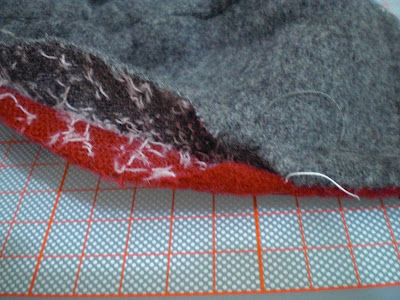
   Let me remind you. This is how double faced wool looks from the side


I suggest you do the hemming last on your project, no matter what you pattern instructions says, because that's the only way I can think of, to have a neatly finished garment with fully enclosed seams.

So you already have basted your pattern pieces at double the seam allowance distance


and you have separated the two fabric layers up to the basting thread, be careful not to go any further.


Now all you have to do is fold inwards both fabrics (grey and red) until their edges meet the basting thread.
Press, using a pressing cloth and cut half width the seam allowance, as you did when you prepared a basic seam. You don't have to check the width of the seam allowances, as long as your basting is at double distance the seam allowance your patterns suggests or you chose to use. By folding the edges inwards you are folding the seam allowance.


That was all! Now sew, catching both the grey and red fabric with the needle, creating a smooth edge.
When reaching a corner try to make a pointy edge (if your pattern calls for one) and cut any excess fabric you have to fold inwards, to avoid bulk.


Press and run to the mirror to admire your garment on! Told you it was easy!


Feel free to contact me if you need help.

See you around
Maria


Monday, May 28, 2012

How to make bound buttonholes on double faced wool

    Now we're making business! This is by far the most difficult part, but if you've tried out the rest, if you've already opened and sewn a seam using my method, you will see that this is based on the same principles, but it takes a bit more of your attention and time. So let's get started.

1. Use an accurate ruler to determine the diameter of the buttons you selected. 

Tip : make sure that the buttons you will use are the same size for both sides, because they will be using the same button holes!


2. Mark the buttonhole on your fabric, according to the pattern, taking of course into consideration the button size. I used heat disappearing markers.
    Making a sample is always helpful, not only for mastering the method, but also for determining you're using the right measurements for the buttonhole.
     This particular buttonhole is 1cm wide, so the middle line stands at exactly 0,5 centimetres. 


3. Now you have to cut the buttonhole open. 
I found it useful and more safe, using my rotary cutter for cutting the middle section and a pointy pair of scissors for the diagonal lines.


4. Now's the tricky part. Open the two layers of the fabric using your fingers and carefully cutting the threads that hold them together, following my first tutorial on seam allowances
    Remember that this buttonhole is 1cm wide, so after cutting it, on step 3, I ended up with 0,5 cm edges, on the long sides. That 0,5cm edge will but turned inside, so I have to make sure that I open the two fabric layers at least 0,5cm. But that may lead to bulkyness, so I will open it more, about 1cm or a bit less, because remember that this will be a bound buttonhole and not only the edges will be sewn inside but also the welts.
    It looks a mess right now, doesn't it? Don't worry, it will be pretty in a short while!


5. Now let's prepare the welts. The welts have to be one piece, but also be red on one side and grey on the other side. At least that's what I wanted. You may have them multicoloured, as in all red on both sides, or one welt grey and one red. What ever you want. 
   For my way, cut strips of the fabric and totally separate the two fabric layers, to end up with one grey and one red. For my 4 buttonholes I need 8 welts, which means I need 8 pieces of red and 8 of grey. The welts have to be wider than the actual buttonhole size, wide enough to allow me to sew them into the buttonhole and narrow enough to fit in the opening I made in step 4. Half a centimetre on each side is enough. 
   Take careful and accurate measurements and cut the welts. Sew the two sides together, one grey one red and interface them. This is the only part of the cape I used, to be more accurate, I could use, interfacing.


6. Back to the buttonhole now. Use basting thread to baste exactly on the marking. Turn the edges inside and give it a good press. Half a centimetre edge is small enough to give you a hard time while sewing the small welts in, so by predefining the edges of the buttonholes you gain time and patience!


7. We are very close to the end! Take the first welt, place it in the buttonhole, making sure the the free edge is 0,5cm. You may find it hand making a marking on the welt at exactly 0,5cm to align it with the buttonhole long edge. 
   Now it's time to start sewing. Catch the folded buttonhole edge and the welt. Be very careful at the corners. They have to be pointy to look pretty and they have to be strong, to last the longest while using them.


    Sew one side and then move to the other side of the fabric. Every welt has to be sewn from both sides of the garment. Use different thread and needle and have it resting there, while sewing the other side. 


8. Repeat for the opposite welt. Give the buttonhole a good press, with a pressing cloth and you're done!
Don't forget to sew the buttons back to back. 


I measured my time. It took me 20 minutes to complete each buttonhole. I consider this to be a good time!


See you around 
Maria

P.S. Let me know if you ever try this.


Next : How to hem with double faced wool

Saturday, May 26, 2012

How to make buttonholes on double faced wool

        I came up with two ways of making buttonholes for my double faced wool cape. Of course you can use the usual one and make them by your sewing machine, but I really didn't like the idea, of just cutting the buttonhole. I thought the cape would end up looking up cheap and I guess by now you know all the amount of work, time and personal effort I invested in this project. I'm only showing you this simple method because I'm sure you can master it better than I did!

1. First of all mark the buttonhole places on your fabric, according to the pattern. You may use thread or a non permanent marker. I'm using heat disappearing markers. 

2. Use an accurate ruler to determine the diameter of the buttons you selected. 

Tip : make sure that the buttons you will use are the same size for both sides, because they will be using the same button holes!


3. Use that measurement to shorten or lengthen the buttonhole marking on your fabric. 
It's useful to always make a sample of the buttonhole on scrap fabric. Sometimes the buttonhole will have the exact length of the button, sometimes it will be a couple of millimetres smaller, if the fabric is too soft or loosely woven or a couple of millimetres wider. 


4. Now slash open the buttonhole right at the marking.
As you've been doing all along, following these tutorials, open the two layer of the double faced wool, carefully with your fingers and cutting the joining threads. 
You don't have to go deep, as you previously did for seam allowances. Half a centimetre is enough.


5. Start sewing going round and round, while turning a bit of the edge in. The ideal will be a couple of millimetres, but to be honest with you I found it difficult. Maybe because I was making a sample and I knew I had the bound buttonholes idea to test too. Maybe it was my fabric. Try it out and it could work for you.


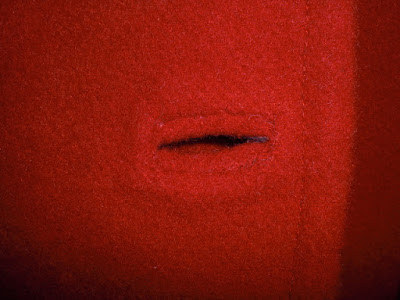
What do you think?
What I didn't like was that opening that's there all the time...

6. Give your buttonhole a good press, using a pressing cloth.
Don't forget to sew the buttons back to back.


See you around
Maria

Next : How to make bound buttonholes on double faced wool


Saturday, May 5, 2012

How to make a dart with double faced wool fabric

      Now I'm going to show you how I made the shoulder darts on my double faced wool cape. In order to understand this tutorial you may have to read my previous one, on how to make a basic seam with double faced wool.
   

1. So here's how the dart is marked on my pattern piece.
You can see my bright yellow basting stitch, 3cm from the edge and the dart
marked on the fabric with heat disappearing marker.
The space between the dart markings is going to fold inwards, 
so using the directions on my previous tutorial,
machine baste, parallel to the dart, half distance the space between the top of the dart.
So if the top of the dart is 2cm, baste at 1cm parallel the dart.


2. Cut right in the middle of the dart, stopping a couple of cm before it's point.


3. Open the cut edges stopping at the basting stitch.
Don't get passed the basting stitch. 
You will reach a point where you won't be able to open.
Just reach as deep as you can with your threads cutter.


4. Fold  the edges inwards and finger press.
I avoided stream pressing because my markings would disappear, 
since I used a heat sensitive marker.

Now start to sew the dart closed.
Use drawstitch for the cut part and  catch with your needle the marked edges all the way to the point.
Repeat the same process for the other side too.


I know it doesn't look very good now, but after it's pressed


You can barely see there's a dart on the grey side.
Unfortunately the red one shows more, but still it's very unnoticeable.


See you around
Maria


Wednesday, May 2, 2012

How to sew a basic seam with double faced wool

     As promised I'm going to explain to you, how I made my double faced wool cape. I'm going to show you my way of making a basic seam, a dart, bound buttonholes and how to hem with this special fabric. Since the garment is going to be double faced, both sides have to look polished. So every seam has to be concealed and as unnoticeable as possible. 
    
   This is how a double faced wool looks from the side.


    It looks like two fabrics are attached to one another, and the truth is that they are! They hold to each other and therefore feel like one piece, because they are anchored together with thread. You'll see what I mean in a while. First we need to prepare our seams.

So here's what you have to do.
1. Cut out all your pattern pieces, as your patterns says and 
as you would normaly do,
 using the seam allowance it suggests.

2. Now double the seam allowance, in your head, don't touch the pattern!
My pattern called for 1,5 cm, so that makes 3cm.

3. Machine baste, with a contrasting colour thread around all pattern pieces.
My machine does not have grooves for more than 2cm, so I marked the 3cm point with adhesive tape.


    Let me get this straight for you. The final garment will have a 1,5 cm seam allowance. We are only doubling it to use it as a guide. See the grey and red wool are held together and I had to separate them. In order to keep a straight line I needed reference.

After you baste all the edges, it looks like this.
[this was the sample, so the line is not perfect straight]


    Half of it is seam allowance. The other half, that lies between the seam allowance and the basting thread, is only there because the seam allowance will fold inwards. Got it?

4. Now take your thread cutter and carefully, using your fingers, open the edge of the fabric.
    Don't stretch the fabric. We want it to keep it's shape. So use the tread cutter to cut the thread that holds them together. Open all the way to the basting thread. The basting thread is your limit. That's how far you can go. Ok?


After you've done this for all the pattern pieces you are ready to begin sewing!
It takes time, but it's worth it!

5. We are going to machine stitch the red side and hand sew the grey side.
While I was making my sample I noticed that hand sewing didn't look as good on red.
So red would be machine stitched!

Align the pattern pieces, as the pattern calls and pin them together.
Be careful to pin only the red seam allowances.
You may have to pin down the grey ones, to avoid sewing over them too.


6. Sew at 1,5 cm.


7. Press open and flat only the red seam allowances.


8. Trim the red seam allowances half width or less.

9. Press the grey seam allowances inwards, forming the edges that will be sewn.
Check and trim them as you did on the red ones.


10. Sew them by hand.


Tada! You made a double faced seam!
After all the seams are finished you can unpick the basting thread and 
give the seam a good press, with a pressing cloth.

    As for the kind of stitch I used for hand sewing, I used a drawstitch. This is how Claire Shaeffer calls it. To be honest I found out this is a "known" stitch, after I tested different versions of my own imagination and decided this looked best. As you can see in the pics above, you catch a small area of the fabric, right on the folded edge, moving from right to left (I'm right handed) and then you do the same for the opposite side. I tried to kind of cross my stitches, so that the beginning of the one on the bottom side would be in the middle of the stitch on the upper side. Did that make sense?
    I also waxed the thread, to make it stronger.


See you around
Maria

Related Posts Plugin for WordPress, Blogger...