As promised I'm going to explain to you, how I made my double faced wool cape. I'm going to show you my way of making a basic seam, a dart, bound buttonholes and how to hem with this special fabric. Since the garment is going to be double faced, both sides have to look polished. So every seam has to be concealed and as unnoticeable as possible.
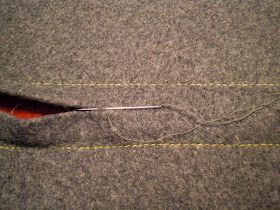
This is how a double faced wool looks from the side.
It looks like two fabrics are attached to one another, and the truth is that they are! They hold to each other and therefore feel like one piece, because they are anchored together with thread. You'll see what I mean in a while. First we need to prepare our seams.
So here's what you have to do.
1. Cut out all your pattern pieces, as your patterns says and
as you would normaly do,
using the seam allowance it suggests.
2. Now double the seam allowance, in your head, don't touch the pattern!
My pattern called for 1,5 cm, so that makes 3cm.
3. Machine baste, with a contrasting colour thread around all pattern pieces.
My machine does not have grooves for more than 2cm, so I marked the 3cm point with adhesive tape.
Let me get this straight for you. The final garment will have a 1,5 cm seam allowance. We are only doubling it to use it as a guide. See the grey and red wool are held together and I had to separate them. In order to keep a straight line I needed reference.
After you baste all the edges, it looks like this.
[this was the sample, so the line is not perfect straight]
Half of it is seam allowance. The other half, that lies between the seam allowance and the basting thread, is only there because the seam allowance will fold inwards. Got it?
4. Now take your thread cutter and carefully, using your fingers, open the edge of the fabric.
Don't stretch the fabric. We want it to keep it's shape. So use the tread cutter to cut the thread that holds them together. Open all the way to the basting thread. The basting thread is your limit. That's how far you can go. Ok?
After you've done this for all the pattern pieces you are ready to begin sewing!
It takes time, but it's worth it!
5. We are going to machine stitch the red side and hand sew the grey side.
While I was making my sample I noticed that hand sewing didn't look as good on red.
So red would be machine stitched!
Align the pattern pieces, as the pattern calls and pin them together.
Be careful to pin only the red seam allowances.
You may have to pin down the grey ones, to avoid sewing over them too.
6. Sew at 1,5 cm.
7. Press open and flat only the red seam allowances.
8. Trim the red seam allowances half width or less.
9. Press the grey seam allowances inwards, forming the edges that will be sewn.
Check and trim them as you did on the red ones.
10. Sew them by hand.
Tada! You made a double faced seam!
After all the seams are finished you can unpick the basting thread and
give the seam a good press, with a pressing cloth.
As for the kind of stitch I used for hand sewing, I used a drawstitch. This is how Claire Shaeffer calls it. To be honest I found out this is a "known" stitch, after I tested different versions of my own imagination and decided this looked best. As you can see in the pics above, you catch a small area of the fabric, right on the folded edge, moving from right to left (I'm right handed) and then you do the same for the opposite side. I tried to kind of cross my stitches, so that the beginning of the one on the bottom side would be in the middle of the stitch on the upper side. Did that make sense?
I also waxed the thread, to make it stronger.
See you around
Maria


Thank you very much for the explanation , but I wonder if there is any machine can do the job as it is very high time consuming when we need to do it for commercial products.
ReplyDeleteI have no knowledge of a machine but then it's been years since I've dealt with double faced wool and technology alwasy amazes us. Maybe they will make one!
ReplyDelete