Tuesday, May 29, 2012

Burda 6/2012 full preview

     This issue has really few interesting patterns and I remain disappointed. The one that caught my eye is this beautiful dress.

Modell Φωτογραφία

   Surprisingly a few more patterns popped in my head, from old Burda issues. Surprisingly because I have the memory of a goldfish! 

This is pattern 126 for issue 6/2010

BM1006 burdasty 2  8-050


Pattern 127 from issue 5/2008
I remember falling in love with this one...
It has an attached neck scarf.

Modell Φωτογραφία

and pattern 121 from issue 3/2009

Modell Φωτογραφία

    Can you spot the differences? They are slight and they are the king that all of us would make, by using different kinds of fabric, lining and embellishments.
     I would prefer sewing any of the old dresses, lucky me I have those back issues, because I would use so much less fabric. They yellow one for example takes 2,50 meters, the pink one 2,20 meters for my size (great issue that one, get it if you don't have it already, you may take a look here). But the dress from the current issue requires 7,20 meters!!! Plus you have to have the fabric pleated. I don't know how that works to the rest of the world, but here in Greece, this is a very expensive thing to do (don't get why, but it is). Also if you have wide hips pleating don't always flatter them. Gatherings may be more gentle to your appearance. So I'm sticking with the back issue pattens!

    I also consider this pants pattern to be interesting, especially because of it's unique side seams and pockets.

109 0612 B
109-062012-M

    This plus size, cargo style skirt is beautiful.

144 0612 B


144-062012-M


That's all folks!


See you around
Maria


Monday, May 28, 2012

How to make bound buttonholes on double faced wool

    Now we're making business! This is by far the most difficult part, but if you've tried out the rest, if you've already opened and sewn a seam using my method, you will see that this is based on the same principles, but it takes a bit more of your attention and time. So let's get started.

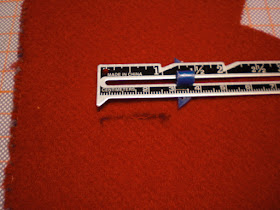
1. Use an accurate ruler to determine the diameter of the buttons you selected. 

Tip : make sure that the buttons you will use are the same size for both sides, because they will be using the same button holes!


2. Mark the buttonhole on your fabric, according to the pattern, taking of course into consideration the button size. I used heat disappearing markers.
    Making a sample is always helpful, not only for mastering the method, but also for determining you're using the right measurements for the buttonhole.
     This particular buttonhole is 1cm wide, so the middle line stands at exactly 0,5 centimetres. 


3. Now you have to cut the buttonhole open. 
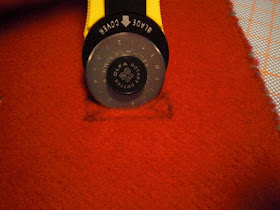
I found it useful and more safe, using my rotary cutter for cutting the middle section and a pointy pair of scissors for the diagonal lines.


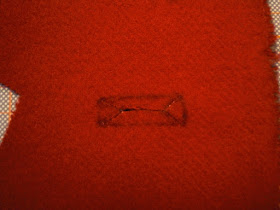
4. Now's the tricky part. Open the two layers of the fabric using your fingers and carefully cutting the threads that hold them together, following my first tutorial on seam allowances
    Remember that this buttonhole is 1cm wide, so after cutting it, on step 3, I ended up with 0,5 cm edges, on the long sides. That 0,5cm edge will but turned inside, so I have to make sure that I open the two fabric layers at least 0,5cm. But that may lead to bulkyness, so I will open it more, about 1cm or a bit less, because remember that this will be a bound buttonhole and not only the edges will be sewn inside but also the welts.
    It looks a mess right now, doesn't it? Don't worry, it will be pretty in a short while!


5. Now let's prepare the welts. The welts have to be one piece, but also be red on one side and grey on the other side. At least that's what I wanted. You may have them multicoloured, as in all red on both sides, or one welt grey and one red. What ever you want. 
   For my way, cut strips of the fabric and totally separate the two fabric layers, to end up with one grey and one red. For my 4 buttonholes I need 8 welts, which means I need 8 pieces of red and 8 of grey. The welts have to be wider than the actual buttonhole size, wide enough to allow me to sew them into the buttonhole and narrow enough to fit in the opening I made in step 4. Half a centimetre on each side is enough. 
   Take careful and accurate measurements and cut the welts. Sew the two sides together, one grey one red and interface them. This is the only part of the cape I used, to be more accurate, I could use, interfacing.


6. Back to the buttonhole now. Use basting thread to baste exactly on the marking. Turn the edges inside and give it a good press. Half a centimetre edge is small enough to give you a hard time while sewing the small welts in, so by predefining the edges of the buttonholes you gain time and patience!


7. We are very close to the end! Take the first welt, place it in the buttonhole, making sure the the free edge is 0,5cm. You may find it hand making a marking on the welt at exactly 0,5cm to align it with the buttonhole long edge. 
   Now it's time to start sewing. Catch the folded buttonhole edge and the welt. Be very careful at the corners. They have to be pointy to look pretty and they have to be strong, to last the longest while using them.


    Sew one side and then move to the other side of the fabric. Every welt has to be sewn from both sides of the garment. Use different thread and needle and have it resting there, while sewing the other side. 


8. Repeat for the opposite welt. Give the buttonhole a good press, with a pressing cloth and you're done!
Don't forget to sew the buttons back to back. 


I measured my time. It took me 20 minutes to complete each buttonhole. I consider this to be a good time!


See you around 
Maria

P.S. Let me know if you ever try this.


Next : How to hem with double faced wool

Saturday, May 26, 2012

How to make buttonholes on double faced wool

        I came up with two ways of making buttonholes for my double faced wool cape. Of course you can use the usual one and make them by your sewing machine, but I really didn't like the idea, of just cutting the buttonhole. I thought the cape would end up looking up cheap and I guess by now you know all the amount of work, time and personal effort I invested in this project. I'm only showing you this simple method because I'm sure you can master it better than I did!

1. First of all mark the buttonhole places on your fabric, according to the pattern. You may use thread or a non permanent marker. I'm using heat disappearing markers. 

2. Use an accurate ruler to determine the diameter of the buttons you selected. 

Tip : make sure that the buttons you will use are the same size for both sides, because they will be using the same button holes!


3. Use that measurement to shorten or lengthen the buttonhole marking on your fabric. 
It's useful to always make a sample of the buttonhole on scrap fabric. Sometimes the buttonhole will have the exact length of the button, sometimes it will be a couple of millimetres smaller, if the fabric is too soft or loosely woven or a couple of millimetres wider. 


4. Now slash open the buttonhole right at the marking.
As you've been doing all along, following these tutorials, open the two layer of the double faced wool, carefully with your fingers and cutting the joining threads. 
You don't have to go deep, as you previously did for seam allowances. Half a centimetre is enough.


5. Start sewing going round and round, while turning a bit of the edge in. The ideal will be a couple of millimetres, but to be honest with you I found it difficult. Maybe because I was making a sample and I knew I had the bound buttonholes idea to test too. Maybe it was my fabric. Try it out and it could work for you.


What do you think?
What I didn't like was that opening that's there all the time...

6. Give your buttonhole a good press, using a pressing cloth.
Don't forget to sew the buttons back to back.


See you around
Maria

Next : How to make bound buttonholes on double faced wool


Wednesday, May 16, 2012

Are you up for more classes?

    Hello all! Sorry I have not been around much. I still owe you two more tutorials on my double faced cape and I will post them soon, I promise!
It's back? Yupi!!!

I had totally regretted not signing up for the Bombshell dress back then, mostly because Gertie will show boning too, but I just did!


If you can't hold your self on the chair right now, if you can't wait to put your fingers on new classes  and suck all the knowledge, just click here!
The discount is huge. Is class is 15 dollars or 11 euros. Pretty good right?
So go ahead take a look, I'm sure you'll find something interesting.

As for the classes I had already signed in, as I suspected I still haven't got the time to take a good look on all of them.
I've watched and kept notes on half The Couture Dress, by Susan Khalje. I love it! It's so straight forward having everything at your finger tip whenever you seek for it. Susan also answers every question you have about anything she says during the video tutorials. It's like I've sneaked in her studio, while she is sewing and talking to her self I guess! Haha.


See you around
Maria


Saturday, May 5, 2012

How to make a dart with double faced wool fabric

      Now I'm going to show you how I made the shoulder darts on my double faced wool cape. In order to understand this tutorial you may have to read my previous one, on how to make a basic seam with double faced wool.
   

1. So here's how the dart is marked on my pattern piece.
You can see my bright yellow basting stitch, 3cm from the edge and the dart
marked on the fabric with heat disappearing marker.
The space between the dart markings is going to fold inwards, 
so using the directions on my previous tutorial,
machine baste, parallel to the dart, half distance the space between the top of the dart.
So if the top of the dart is 2cm, baste at 1cm parallel the dart.


2. Cut right in the middle of the dart, stopping a couple of cm before it's point.


3. Open the cut edges stopping at the basting stitch.
Don't get passed the basting stitch. 
You will reach a point where you won't be able to open.
Just reach as deep as you can with your threads cutter.


4. Fold  the edges inwards and finger press.
I avoided stream pressing because my markings would disappear, 
since I used a heat sensitive marker.

Now start to sew the dart closed.
Use drawstitch for the cut part and  catch with your needle the marked edges all the way to the point.
Repeat the same process for the other side too.


I know it doesn't look very good now, but after it's pressed


You can barely see there's a dart on the grey side.
Unfortunately the red one shows more, but still it's very unnoticeable.


See you around
Maria


Friday, May 4, 2012

Burda 6/2012 early preview

    Well I'm officially disappointed and I'm seriously considering to not buy this issue. Burda can get me up to the skies and have me dreaming of outfits all day long, or look at the models and think "what on earth...". Maybe it's the fabrics, the prints, the colours, I don't know but I don't think I would bother making these ones. Let me show you the few highlights I found.

116B 0612 B
121 0612 B

129 0612 B

109 0612 B


     That's it! An interesting dress, mostly because of the texture, a unique jacket, a basic dress and pants that I bet I can find in back issues and a really pretty dress, but if I can see correctly, you would have to use a pleated fabric (never found one of these) or have it pleated, which cost awfully a lot. I remember a similar dress a few years ago, I'll find it for you.
     I'll wait for the full preview and the techniqual drawings, which offen reveal an interesting pattern, before I make my verdict. Now they seem to me shapeless, weird, you know the kind that makes you rise your eyebrow! If you like check the rest of the preview here.

105 0612 B118B 0612 B128 0612 B149A 0612 B-V126 0612 B120 0612 B124 0612 B122 0612 B
114A 0612 B108 0612 B111B 0612 B104 0612 B


See you around
Maria