Saturday, April 30, 2011

Dress to skirt or skirt from dress!

   
    I found this fake leather dress on sales and it was practically a steal. If my memory serves me right I bought it for 8 or 10 Euros. I bought it though it didn't fit me... kind of!


    See when I put it on, I realised that, although it said size 38, the torso length was way too short and the waist stood on the wrong place. I think it was a petit pattern, sized as a non-petit. If I put the bust right, the dress was too short and the "belt" piece was hitting my ribs. But if I lowered the whole dress (leaving my bust uncovered) it looked nice as a skirt. That parallel "belt" piece could make a wonderful waist band I thought...hmmm.


   It is very carefully constructed. The lining was sewn all over the dress and bagged in the skirt. The fake leather was also of very good quality, you may think its real leather before you carefully observe it, but is going to be observing very closely my skirt?
  So I bought it, ripped off the bust, shortened the zipper and made a skirt out of it! As I was ripping the lining, in the waist seam, I accidentally ripped off a vertical seam of the skirt, but that gave me the answer on how to sew the lining on the waistband, since it was bagged in the hem. I turned it upside down, sewn everything in place and through that accidentally ripped off seam I turned it over. Then I did a very close seam, no one know it is there!


This is the front


This is the back


and here's a close look at the waistband.


  Now I have to think of something about the left over bust piece... any ideas?

See you around
Maria

Thursday, April 28, 2011

Unexpected inspiration!

    Have you bought the last issue of Burda (May)? I did yesterday. I always check what's in it through the website and lately I've found my self disappointed a few times. I've been buying Burda issues since 2005. Not every issue, only those I thought they had patterns I could make. I came to regret those choises many times, cause I changed my mind about fashion and what looks good on  me, or cause I've seen what someone else did with a pattern I don't have...
   I believe Burda has changed. I mean, when I look back at the issues from 2005 and 2006, I see conservative patterns. Classy, but mostly for more mature women. I thought so then, I still do now, that I'm older and I have a job which requires some clothing standard.  
   Through the last years Burda adopted a more hip view on things. Added a lot of curent fashion patterns and expanded ones choises. Unfortunately, there was a period most, if not all, of the patterns in an issue where too hip for me and any other girl (judging from some conversation at the Burdastyle discussion board) and without shape.
   So the May issue came as a surprise to me. It has a combination of hip and vintage and conservative (check out the last photo).

   Look at this
hip, summery dress, with smoking on the bust.
Elastic smoking was all over last summer and many sewers had troubles trying to make their machines use elastic tread!
Well I didn't really need a pattern for that, but someone may did.

How about this
Modell Photo

very simple pattern of a very versatile shirt, made of jersey or such fabric.

Or these.
Modell Photo

I think I am going to make these ones. And I mean both the trousers and military jacket!
The drawing shows a very promising pattern and that back yoke always makes the fitting easier.


But this is my favorite

Modell Photo

It doesn't really show much in this pic.

Here you can see the detail on the front


I love love love it and I do do do want it!
Next time I'll go fabric shopping I'll have my mind set to finding a nice airy fabric for this.

This looks very promissing too.
Modell Photo

But I'm not sure how it looks in normal and not model posture.
I mean the desing is boxy
and the other version / pic doen't really help

Modell Photo

Don't look at the back fitting, it's probably the wind blowing!

And if the above were my favorites and have been added to my wish list, these are to be avoided

Modell Photo

Please don't make me wear this neck line, with these sleves and that full skirt...
I've seen so many full skirted dresses on Burda l've had enough.
I'm even surprised this one didn't have a gathering and has pleats istead.

And here's the skirt version

I thought I liked this dress, but eventually I don't

 I don't know much about pattern designing but there's something weird in this one.
I like it more as a drawing.


This is much better,

Modell Photo

but I've noticed that the bust sits funny on the models.
The cups are kind of pointy and seem empty, although both models do have breasts!


And some blast from the past.

Modell Photo

The wonderful 80's are all around us!

How do you feel about this one?

If I'll go for it I'll omit the baggy back


cause it probably looks like in this dress, with the Peter Pan collar.

Modell Photo

See you around
Maria


Saturday, April 23, 2011

Craft envy!

There are times when there's nothing more than a gap in your head .


Why didn't I think of that, when I was staring for hours a bag of polyfoam eggs, trying to figure out what to do with them?
Excellent tutorial by Nikki, In Stitches.

These, from mypoopet, could have been a great idea too,


especially the fabric covered one. Such beautiful colours.

And of course the Elegant Eggs, from Martha Stewart


I did thing about decoupaging, but I didn't have any interesting napkins lying around and I wanted to start right away...

So I decided to go along with this tutorial, but without going shopping for ribbons and other decorative stuff, just use whatever I already had in my stash.

That's the result...


Yeah I know not the best choice of colours, but hey the bows are just pinned and can be replaced any time!

May be I should have gone for that instead and forget about the foam eggs


Brilliant idea from Come Together Kids

More eggs next year!

Happy Easter

See you around
Maria


Thursday, April 21, 2011

Daisy eggs!


   Today it's Big Thursday for the Orthodoxes, but we also call it Red Thursday. According to our tradition and religion, this is the day you can dye eggs and they won't go rotten. Red eggs symbolize the sacrifice of Jesus.
    In my family we put floral and herbal prints on our eggs and I'm going to show you how.
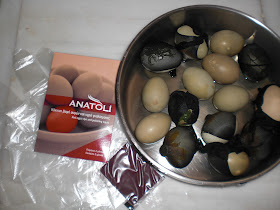
    Here is my pot with boiled eggs and a package of egg dye. It contains the coloured powder, a pair of gloves and polish, which I threw right away. I'm replacing that one with olive oil. 


    Take an old pair of panty hoses, to wrap the eggs, before you boil them, while carefully placing leaves or flowers, between the egg shell and the panty hose, like this.


I used daisies, anise and parsley leaves.
Wrap them tight.
Boil the egss and follow the instractions of your egg dye.


Egg dyes usually tell you to add wine vinegar. Add a lot of it. Vinegar thins the calcium on the eggs shells and helps the dye to act.
Take the eggs off the dye and let them dry completely.  


Use a pair of scissors to take off the panty hose and peel off the herbal leaves, than have sticked on the egg shells, because they boiled with them.
Sorry I didn't take photos at this point, but I was to messy to touch my camera!
This is the first one I unwrapped, but I'll have to throw it away, cause it slipped my hands and it broke...ups!


Isn't it cute?
Please don't use the polish you will find in your egg dye package. We don't need any more chemistry.
Take a big piece of cotton and put some olive oil on it.


Use it to carefully polish your eggs. 
(If you try to polish them before they dry completely, the red dye will peal off. Be patient)

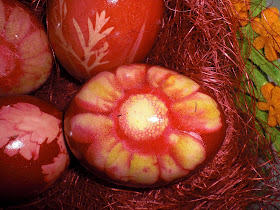
Here are mine.


I totally love this one.


The yellow colour came from the daisy. Doesn't it look like you used paint and brush?
Happy Easter!

See you around.
Maria

Sunday, April 17, 2011

I must be doing something wrong...

    While I was struggling to have skirt 116 from Burda Magazine 9/2010 fit, I met this problem. I think it has to do something with geometry, but I can't find out what! Do you have any clue?
    Here's the paper pattern. Very carefully traced and cut and as I checked twice each curved piece matches the  other pattern piece perfectly.


But when the pieces were sewn together I ended up with this


As you can see, only one seam was a perfect match (don't pay any attention to the pointy pieces, if this wasn't a muslin they would be cut off). Here's a close look.


Why does' this happen? Every single piece and every single side of every single piece has the same seam allowance and has been checked twice. If I go pinning the back skirt panel it looks like this


So my seam line leaves out some pattern parts. 
Here's a close with a drawn seam line.


There has to be some kind of an answer. Do you know it by the way?

See you around
Maria


Take number three...

    I'm back trying to fit that skirt. Did it work? No it didn't. As I told you in my previous post, I traced and cut a size 36. I did manage to get into the skirt, but I didn't like at all the way it hugged my body, everything was exposed, in a not good way!
    I thought ok, don't give up. I cut the lining too, thinking that sometimes the lining helps the way the fabric behaves when worn. I basted the lining on the skirt and I tried it on again... no change, not one at all. 
     I thought ok, it has to do with the pattern. See those curved pieces help showing up and leveling up the curves I already have, so I should eliminate them. To achieve that I taped piece no. 23 to the front skirt panel and I cut a new piece of muslin. 


    I sewed everything together. Did it work? No it didn't... urg! I've had enough with this pattern. I still have a glimpse of hope inside me, that if I cut it from a stiff woolen fabric it will flatter me more. So I kept the paper pattern and lining and threw everything else away, thinking I'll pick a new skirt to sew in the next few days.


    Conclusion : If you are a skinny girl, that wants to look more curvy, this is an ideal pattern. But if you are a curvy girl like me, with a mediterranean body type do avoid it, cause at all three muslin takes I looked like I was wearing Pampers and trust me it wasn't good. Never the less, I have to admit it's a very easy pattern and quick to make. 

See you around
Maria