I'm looking for...

Saturday, January 19, 2013

Shelf pin board

   Let's say you need a pin board but your space is limited and you don't want to make holes on the wall... do what I did!
 

    Buy a cheap photo frame and replace the glass with cork! I used the sample picture that comes with the frame to cut 2 pieces of the cork, because it was quite thin. Place it in the frame and done! Probably the fastest project I've made!

     Ok I'll be honest with you. I didn't need it as much. I've never used one before, I find other places to put my notes on, but I'm about to start some serious studying and a little space renovating felt good. Plus I really wanted to use those cute push pins! Look at them! Now I have to take a note to pin!
Wish me luck, because I'm going to spend days and days on this desk.


See you around 
Maria

Thursday, January 17, 2013

Back for a day

    Hello all!
    I hope you are all feeling fine, being creative and keep up all the good work! I wish you a Happy and Creative New Year!
    I have to apologize my dear readers for being away all this time and not even saying goodbye. I'm sorry, it's not like me to disappear without a word. It's only that at first I was hopping I would find time and post about my news, but then too much time went by...
    It seems to be kind of common these days. Lots of bloggers seem to have gone extinct in the blog sphere! We all have our reasons I guess.
   It's good to be back again, but I can't stay. Too many things have happened in my life. I had to take decisions I couldn't avoid any more and it's time to take more care of me. So, although I can't stop creating, even small things to keep me sane, I can't blog right now. I'll try to come back every now and then though.
   Thank you all for your support and feel free to contact me at any time.

See you around
Maria

P.S. Craftsy.com has some free classes you need to check out. It's free after all!

Thursday, July 19, 2012

How to hem double faced wool

   This is the last of my tutorials about my double faced cape. Please read the previous ones to have a spherical view on the method I followed and this one will be a piece of cake, I promise!


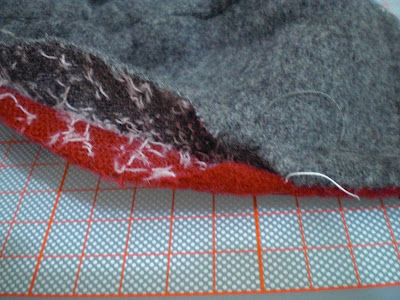
   Let me remind you. This is how double faced wool looks from the side


I suggest you do the hemming last on your project, no matter what you pattern instructions says, because that's the only way I can think of, to have a neatly finished garment with fully enclosed seams.

So you already have basted your pattern pieces at double the seam allowance distance


and you have separated the two fabric layers up to the basting thread, be careful not to go any further.


Now all you have to do is fold inwards both fabrics (grey and red) until their edges meet the basting thread.
Press, using a pressing cloth and cut half width the seam allowance, as you did when you prepared a basic seam. You don't have to check the width of the seam allowances, as long as your basting is at double distance the seam allowance your patterns suggests or you chose to use. By folding the edges inwards you are folding the seam allowance.


That was all! Now sew, catching both the grey and red fabric with the needle, creating a smooth edge.
When reaching a corner try to make a pointy edge (if your pattern calls for one) and cut any excess fabric you have to fold inwards, to avoid bulk.


Press and run to the mirror to admire your garment on! Told you it was easy!


Feel free to contact me if you need help.

See you around
Maria


Related Posts Plugin for WordPress, Blogger...